


Nikon D200 Manual: A Comprehensive Guide
This guide provides detailed instructions for the Nikon D200, covering setup, operation, advanced techniques, and troubleshooting – all in a downloadable PDF format.
The Nikon D200 is a versatile digital SLR camera designed for photographers of all skill levels. This comprehensive manual serves as your guide to unlocking the full potential of this powerful camera. Whether you’re a beginner or a seasoned professional, this resource will help you navigate its features and settings with confidence.
The D200 offers a robust set of capabilities, including RAW image capture, versatile flash options, and extensive image editing possibilities. This manual details everything from initial setup and basic operations to advanced shooting techniques and menu customization. It also provides solutions to common issues you might encounter, ensuring a smooth and enjoyable photographic experience. Download the PDF version for convenient offline access and detailed guidance.
Key Features and Specifications
The Nikon D200 boasts impressive specifications for its class. It features an ISO range of 100-1600, providing flexibility in various lighting conditions. The camera supports multiple flash modes, including automatic, off, and red-eye reduction. It achieves a continuous shooting speed of 5 frames per second, ideal for capturing action.
Furthermore, the D200 is fully compatible with the Exif Version 2.21 standard, embedding valuable image data. This camera supports RAW and JPEG file formats, offering choices for image quality and editing. Detailed information regarding focus modes and user settings are available within this manual, enabling photographers to tailor the camera to their specific needs and preferences for optimal performance.

Getting Started with Your Nikon D200
Begin your journey with unpacking, initial setup, and understanding the camera’s body and controls – a quick start guide for immediate use!
Unboxing and Initial Setup
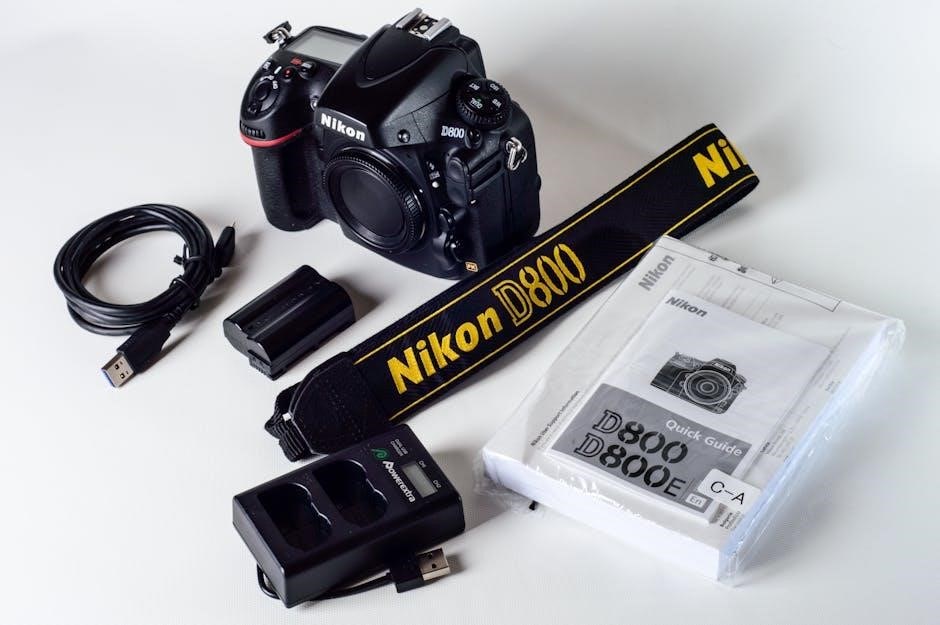
Upon receiving your Nikon D200, carefully inspect all included items. The package should contain the camera body, battery, battery charger, strap, USB cable, video cable, and printed documentation – including a brief quick start guide. Before powering on, ensure the battery is fully charged using the provided charger.
Next, insert the battery into the battery compartment, following the diagram in the manual. Similarly, insert a compatible memory card (CompactFlash) into the designated slot. A quick initial setup will prompt you to select your language, date, and time. This initial configuration is crucial for proper camera operation and accurate image metadata. Refer to the comprehensive user manual for detailed illustrations and step-by-step instructions.
Understanding the Camera Body and Controls
The Nikon D200 features a robust and ergonomically designed body. Key controls include the mode dial for selecting shooting modes (Auto, Program, Aperture-Priority, Shutter-Priority, Manual), the shutter button, and the control dials for adjusting settings. Familiarize yourself with the location of the AF-area mode selector, used to choose the focus area.
The rear panel houses the LCD screen for image review and menu navigation, along with buttons for accessing various functions like white balance, ISO, and image quality. Understanding the function of each button and dial is essential for efficient operation. The user manual provides detailed diagrams and explanations of all camera controls, ensuring you can quickly master the D200’s interface.
Inserting the Battery and Memory Card
To begin, locate the battery compartment on the bottom of the Nikon D200. Insert the EN-EL3e battery, ensuring it clicks securely into place. The camera requires a charged battery for operation. Next, find the memory card slot, also on the bottom, and insert a CompactFlash (CF) card.
Push the card in until it locks. The D200 supports CF cards for storing your photos. Ensure the card is properly seated to avoid data corruption. The manual details proper insertion techniques and troubleshooting steps if the camera doesn’t recognize the battery or card. Always power off the camera before inserting or removing either component.

Basic Camera Settings and Operations
Mastering fundamental settings like date, time, language, and shooting modes (Auto, Program, Aperture-Priority, etc.) is crucial for utilizing the Nikon D200 effectively.
Setting the Date, Time, and Language
Properly setting the date and time on your Nikon D200 is essential for accurate image metadata and organization. Access the setup menu through the camera’s main menu system. Navigate to the “Date/Time” option, typically found within the setup menu. Here, you can adjust the year, month, day, hour, and minute. Ensure the time is set correctly for your time zone.
To change the display language, locate the “Language” setting within the setup menu. The Nikon D200 supports multiple languages, allowing you to customize the camera’s interface to your preference. Select your desired language from the available options. Remember to execute the changes and exit the menu to save your settings. Accurate date, time, and language settings contribute to a streamlined and personalized shooting experience.
Choosing the Shooting Mode (Auto, Program, Aperture-Priority, Shutter-Priority, Manual)
The Nikon D200 offers a range of shooting modes to suit various photographic situations and user skill levels. Auto mode simplifies operation, letting the camera handle all settings. Program (P) mode allows some control over ISO, white balance, and image quality while maintaining automatic exposure.
Aperture-Priority (A) mode lets you set the aperture, controlling depth of field, while the camera determines shutter speed. Shutter-Priority (S) mode allows you to set the shutter speed, freezing or blurring motion, with the camera adjusting the aperture. Manual (M) mode grants full control over both aperture and shutter speed, ideal for experienced photographers. Experiment with each mode to understand its strengths and achieve your desired creative results.
Understanding Focus Modes (AF-S, AF-C, AF-A)
The Nikon D200 provides three primary autofocus modes to accommodate different subjects and shooting scenarios. AF-S (Single AF) is best for stationary subjects; the camera focuses once when you half-press the shutter button. AF-C (Continuous AF) is ideal for moving subjects, continuously adjusting focus as they move, tracking them within the frame.
AF-A (Auto AF) automatically switches between AF-S and AF-C, attempting to determine the best mode based on the subject’s movement. Utilize the user settings to customize the focus area mode, selecting single-point, dynamic-area, or auto-area options. Understanding these modes and their applications will significantly improve your image sharpness and overall photographic success.

Advanced Shooting Techniques
Mastering exposure compensation, metering systems, and white balance settings unlocks the Nikon D200’s full potential for creative and technically sound photography.
Working with Exposure Compensation
Exposure compensation is a crucial tool for fine-tuning the brightness of your images when the camera’s metering system doesn’t quite capture your intended result. The Nikon D200 allows you to easily adjust exposure, overriding the camera’s automatic settings. This is particularly useful in challenging lighting situations, such as scenes with strong backlighting or high contrast.
You can adjust exposure compensation using the camera’s control dial, typically in steps of 1/3 or 1/2 EV (Exposure Value). Positive values will brighten the image, while negative values will darken it. Experimenting with exposure compensation allows you to achieve the desired look and prevent blown-out highlights or underexposed shadows, ensuring well-balanced and visually appealing photographs.
Utilizing the Metering System
The Nikon D200 features a sophisticated metering system designed to accurately measure light and determine the optimal exposure settings. Understanding its operation is key to achieving well-exposed images. The camera offers several metering modes, including Matrix, Center-weighted, and Spot metering, each suited for different shooting scenarios.
Matrix metering evaluates the entire scene, while Center-weighted prioritizes the center of the frame. Spot metering measures light from a very small area, ideal for precise exposure control in tricky lighting. Selecting the appropriate mode, combined with exposure compensation when needed, ensures your photos are properly exposed, capturing detail in both highlights and shadows. Mastering these modes unlocks creative control.
Understanding White Balance Settings
White balance (WB) is crucial for accurate color rendition in your photographs. The Nikon D200 offers a range of preset white balance options, including Auto, Incandescent, Fluorescent, Direct Sunlight, Cloudy, and Shade. These presets compensate for different color temperatures of light sources, ensuring whites appear white and colors are natural.
Auto WB generally performs well, but can sometimes be inaccurate. For precise control, use the preset modes or custom WB, allowing you to measure a white object in the scene. Incorrect WB results in color casts – images appearing too warm (yellowish) or cool (bluish). Experimenting with WB settings unlocks creative possibilities, intentionally altering color tones for artistic effect.

Image Quality and File Formats
The Nikon D200 supports both RAW and JPEG formats, offering flexibility in post-processing and file size management for optimal image quality.
RAW vs. JPEG: Choosing the Right Format
Selecting between RAW and JPEG significantly impacts your workflow and image editing capabilities with the Nikon D200. JPEG files are compressed, resulting in smaller file sizes and are ready for immediate use, but offer limited editing flexibility. They’ve already undergone processing by the camera.
RAW files, conversely, contain unprocessed data directly from the sensor. This provides maximum control during post-processing, allowing adjustments to white balance, exposure, and other parameters without significant quality loss. However, RAW files are considerably larger and require dedicated software for editing.
For photographers prioritizing convenience and immediate sharing, JPEG is suitable. Those seeking maximum image quality and editing control should opt for RAW. The D200’s support for both formats empowers you to choose the best option for your specific needs and creative vision.
ISO Sensitivity and Noise Reduction
The Nikon D200 offers an ISO range of 100-1600, allowing you to adjust the camera’s sensitivity to light. Lower ISO settings (100-400) produce cleaner images with minimal noise, ideal for well-lit conditions. As you increase the ISO, the camera becomes more sensitive, enabling shooting in darker environments, but introduces digital noise.
Understanding noise is crucial; it appears as graininess or speckling in your images. The D200 incorporates noise reduction technology to mitigate this effect. Experiment with different ISO levels and observe the resulting image quality to find the optimal balance between brightness and noise.
Higher ISOs (800-1600) are useful for action or low-light scenarios, but be mindful of the potential for increased noise. Post-processing software can further refine noise reduction, enhancing image clarity.
Understanding Exif Version 2.21 Support
The Nikon D200 fully supports the Exif (Exchangeable Image File Format) version 2.21 standard. This is a critical feature, as Exif data embeds valuable information directly into your image files. This metadata includes camera settings like aperture, shutter speed, ISO, and white balance, providing a complete record of how the photo was taken.
Beyond camera settings, Exif data can also store details like date, time, GPS coordinates (if enabled), and even copyright information. This embedded data is incredibly useful for organizing, searching, and archiving your photos. It also aids in post-processing and allows others to understand your photographic choices.
Compatibility is key; Exif 2.21 ensures your D200 images will be readily recognized and interpreted by most photo editing software and online platforms.

Menu Navigation and Customization
Explore the D200’s extensive menu system for personalized settings. Utilize user settings and custom functions to tailor the camera to your shooting preferences efficiently.
Navigating the Nikon D200 Menu System
The Nikon D200’s menu system is logically organized into several tabs, each dedicated to a specific category of settings. These include Setup, Shooting, Recording, Playback, and Custom Settings. Accessing the menu is done via the ‘Menu’ button on the camera’s back panel.
Within each tab, options are presented as lists, navigated using the multi-selector and adjusted with the main command dial. Understanding the hierarchical structure is key to quickly finding desired settings. The ‘?’ button provides helpful on-screen explanations for each menu item.
Pay close attention to the Custom Settings menu, as this is where you can personalize the camera’s behavior to match your shooting style. Remember to save your preferred settings to a user bank for easy recall.
User Settings and Custom Functions
The Nikon D200 allows extensive personalization through User Settings and Custom Functions. These features enable photographers to tailor the camera’s operation to their individual preferences and shooting styles. You can store up to four sets of custom settings, accessible via the setup menu.
Custom Functions offer granular control over various camera operations, from autofocus behavior to button assignments. For example, you can customize the AE-L/AF-L button or adjust the metering mode.
Utilizing these settings streamlines your workflow and enhances efficiency. Don’t forget the two-button reset function to revert to factory defaults if needed, ensuring a clean slate for new configurations.
Resetting Menu Settings (Two-Button Reset)
Occasionally, you might find the Nikon D200’s menu settings become complex or unresponsive due to numerous customizations. Fortunately, a convenient “Two-Button Reset” function allows you to quickly restore the camera to its factory default settings. This is incredibly useful for troubleshooting or when preparing the camera for a new user.
To perform the reset, simultaneously press and hold the gray button labeled “?” (help) and the up button on the directional pad. Keep holding both buttons until the LCD screen displays “Reset all settings?” Confirm your choice, and the camera will revert to its original configuration.

Remember this doesn’t affect images on your memory card!

Troubleshooting Common Issues
This section addresses frequent problems like focusing errors, error messages, and battery concerns, offering solutions to ensure optimal Nikon D200 performance and usability.
Addressing Focusing Problems
If your Nikon D200 struggles with focus, first verify your chosen focus mode (AF-S, AF-C, or AF-A) suits the subject’s movement. Ensure the focus area mode is appropriately selected – single, dynamic, or auto-area – for the scene. Confirm sufficient light is available, as low light can hinder autofocus performance.
Check the lens for cleanliness and proper attachment. A dirty lens or loose connection can cause focusing inaccuracies. Experiment with different focus points, and try pre-focusing on a similar distance if autofocus consistently fails. Remember to utilize the user settings to customize autofocus behavior to your preferences. If issues persist, consult the manual’s section on ‘Mode Zone AF’ for advanced control.
Finally, a two-button reset can sometimes resolve unexpected camera behavior impacting autofocus functionality.
Dealing with Error Messages
The Nikon D200 displays error messages to indicate potential problems. Consult the camera’s LCD screen and refer to the comprehensive error message list within the full user manual (available as a PDF download). Common errors relate to the battery, memory card, or lens compatibility.
If an error occurs, attempt a simple solution first: re-insert the battery or memory card, or reattach the lens. A two-button reset can often clear temporary glitches causing erroneous messages. Note the specific error code displayed, as this aids in targeted troubleshooting.
If the problem persists, the manual provides detailed explanations and recommended actions for each error. Ensure the firmware is up-to-date, as updates sometimes address known error triggers.
Battery Life and Power Management
The Nikon D200’s battery life varies depending on shooting conditions and features used. Expect approximately a certain number of shots per full charge, though frequent LCD use and flash firing will reduce this. To maximize battery life, utilize the power-saving features built into the camera.
Enable auto power-off, and adjust the LCD brightness to a comfortable, yet lower, setting. When not actively shooting, switch the camera off instead of leaving it in standby mode. Consider carrying a spare, fully charged battery for extended shooting sessions.
Proper battery care is crucial; avoid extreme temperatures and store batteries correctly when not in use.